 Save
Save My sister texted me a photo of candy apples at a fall festival, and I immediately thought there had to be an easier way to make them at home without the sticky mess of traditional hard candy coating. That afternoon, I raided my pantry and discovered those soft caramel candies I'd been saving, and within minutes, I realized I'd stumbled onto something even better than the original—apple slices instead of whole apples, which meant you could actually enjoy them without your teeth getting stuck. The addition of dark chocolate felt like a natural next step, and the moment I drizzled it over those glossy caramel-coated slices, I knew this was going to become a regular kitchen habit.
I brought these to a potluck last spring, and watching people's faces light up when they realized they could just pop a slice in their mouth without commitment was pure joy. One friend who claimed she didn't even like apples went back for four more, which tells you something about how the caramel and chocolate completely transform the experience. That's when I realized this wasn't just a candy apple hack—it was a gateway dessert for people who think they don't want fruit.
Ingredients
- Crisp apples (Granny Smith or Honeycrisp): The tartness cuts through all that caramel and chocolate richness, and crisp varieties hold up better to dipping without getting mealy.
- Lemon juice: A tablespoon prevents that sad brown oxidation that happens within minutes of slicing—seems small, but it's the difference between looking fresh and looking forgotten.
- Soft caramel candies: These melt faster and more evenly than making caramel from scratch, and honestly, they taste just as good without the temperature anxiety.
- Heavy cream: This loosens the caramel to the perfect dipping consistency and adds a subtle richness that hard candy can never achieve.
- Dark chocolate (60–70% cocoa): The deeper cocoa percentage balances the sweetness of the caramel and prevents this from tasting like pure sugar on a stick.
- Coconut oil or unsalted butter: A teaspoon thins the chocolate just enough for drizzling without making it taste greasy or watered down.
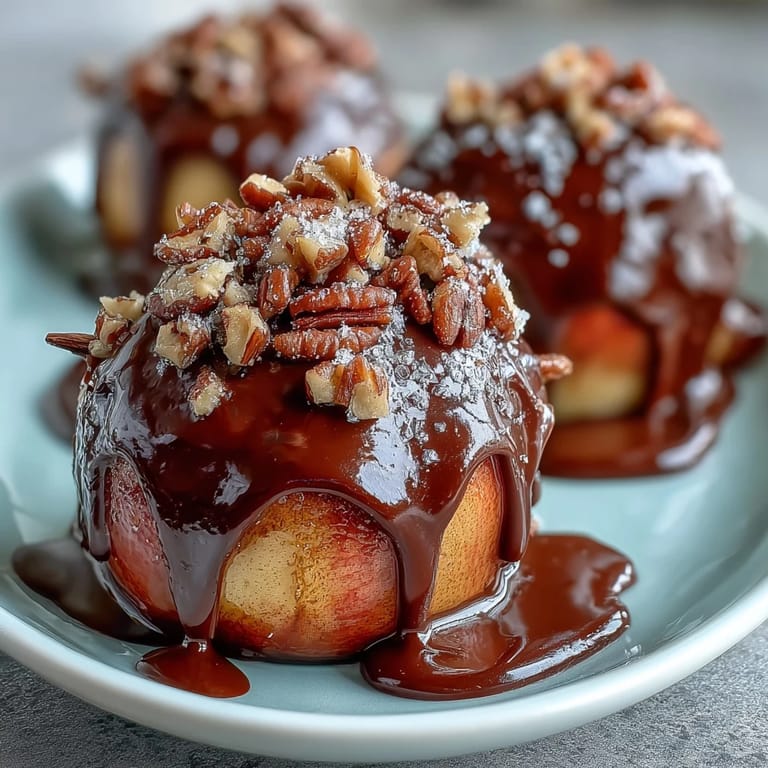
- Garnishes (optional): Toasted nuts add crunch, sprinkles bring nostalgia, and flaky sea salt is the secret move that makes people wonder what you did differently.
Tired of Takeout? 🥡
Get 10 meals you can make faster than delivery arrives. Seriously.
One email. No spam. Unsubscribe anytime.
Instructions
- Prep your apples like you mean it:
- Slice your apples into wedges, then toss them immediately with lemon juice and pat them completely dry—any moisture will make the caramel slide right off. This is the moment where you're setting yourself up for success, so don't rush it.
- Give each slice a handle:
- Push a popsicle stick or sturdy skewer into each wedge so you have something to hold onto without your fingers ending up sticky. Think of it as giving your apple slices a little wooden hat.
- Melt your caramel gently:
- In a small saucepan over low heat, stir those unwrapped caramel candies with heavy cream until they're completely smooth and pourable—this usually takes about 3 minutes. Let it cool for a couple minutes so you don't burn yourself, but don't let it get too thick.
- Dip with confidence:
- Hold each apple slice by its stick and dip it about halfway into the caramel, then let the excess drip off for a few seconds before placing it on parchment paper. You want an even coat, not a caramel blob.
- Give the caramel time to set:
- Pop your tray in the fridge for exactly 5 minutes—this firms up the caramel enough that the chocolate won't just slide off. It's a short rest, but it matters.
- Melt your chocolate carefully:
- In a microwave-safe bowl, heat the chopped dark chocolate with coconut oil in 20-second bursts, stirring between each one until it's silky and smooth. Microwaves are unforgiving, so those short intervals keep you from accidentally seizing the chocolate.
- Drizzle with character:
- Using the back of a spoon or a piping bag, create those beautiful chocolate drizzles across each caramel-coated slice. Work quickly, but don't stress if your lines aren't perfect—rustic looks better anyway.
- Finish with your choice of toppings:
- Sprinkle nuts, colorful sprinkles, or sea salt immediately while the chocolate is still a bit tacky so everything sticks. This is where you get to make them your own.
- Chill until set:
- Give them another 5–10 minutes in the fridge so the chocolate solidifies and everything bonds together. Serve them chilled or at room temperature, depending on your mood.
 Save
Save There's something almost magical about the moment when you pull these out of the fridge and the chocolate snaps cleanly when you bite into it, releasing that caramel interior and hitting the crisp tartness of the apple all at once. It's the kind of simple pleasure that tastes like someone really spent time on it, even though you barely broke a sweat.
Why Slices Beat Whole Apples
Whole candy apples are iconic, sure, but they're also awkward to eat, hard on your teeth, and create this weird separation between the coating and the fruit inside. Slices solve all of that—you get the satisfying caramel-to-apple ratio in every single bite, and eating them feels less like a commitment and more like a treat. Plus, they photograph better, which I'm not sorry about admitting.
The Dark Chocolate Difference
Milk chocolate would make this sweeter, but dark chocolate creates this sophisticated balance that elevates the whole thing from nostalgic fair food to something you'd feel proud serving to guests. The cocoa flavor also echoes the apple's complexity instead of just piling sugar on top of sugar, which is why these never feel cloying even when you eat three in a row. If you're tempted by white chocolate, go for it—just know you're making a different dessert entirely.
Storage and Make-Ahead Magic
These are truly best the day you make them, when the apple is still crisp and the caramel-chocolate shell has that perfect snap to it. Store them in an airtight container in the fridge if you need them to last a day or two, but plan on eating them fresh—they're worth the minimal effort. If you're prepping for a gathering, you can slice and lemon-juice your apples hours ahead, then do the dipping and chocolate work right before serving.
- Assemble these no more than 4 hours before serving if you want the apples to stay crisp.
- Room temperature actually works better for eating than straight from the fridge—the chocolate softens just slightly and becomes more enjoyable.
- Leftover melted chocolate can be reheated and used for dipping fruit later, so nothing goes to waste.
 Save
Save This recipe proved to me that sometimes the best kitchen discoveries come from trying to solve a problem—in this case, making candy apples less intimidating and more fun. Keep these on your radar for when you want something that tastes indulgent but comes together faster than you'd expect.
Recipe Questions & Answers
- → What type of apples work best?
Crisp varieties like Granny Smith or Honeycrisp are ideal as they hold their texture and balance the sweetness of caramel and chocolate.
- → How do I prevent apples from browning?
Toss apple slices in lemon juice to slow oxidation and keep their fresh appearance before coating.
- → Can I substitute dark chocolate with other types?
Yes, milk or white chocolate can be used for a sweeter finish, though dark chocolate adds a richer flavor contrast.
- → How long should I chill the slices?
Chill the caramel-coated apple slices for about 5 minutes before adding chocolate, then chill again for 5 to 10 minutes to set the topping.
- → Are there options for nut-free garnishes?
Absolutely—sprinkles, seeds like pumpkin or sunflower, or simply flaky sea salt offer great alternatives to nuts.
- → What tools are needed for preparation?
You’ll need a baking sheet, parchment paper, small saucepan, microwave-safe bowl, mixing spoons, popsicle sticks or skewers, and paper towels.