 Save
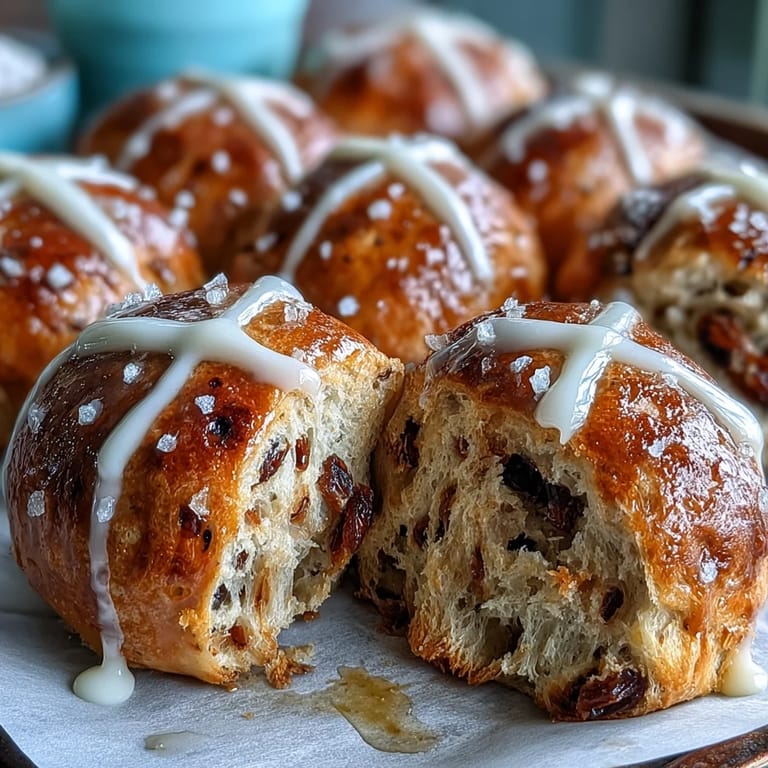
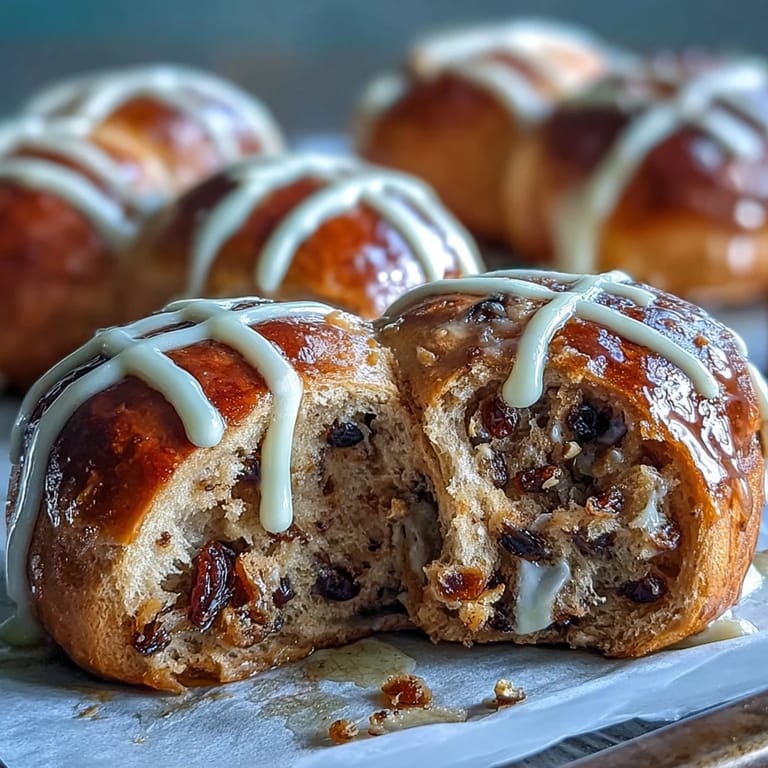
Save The aroma of these hot cross buns baking always turns my kitchen into a comforting haven—even if I’m just dodging rain showers outside. The first time I tried my hand at this classic recipe, I was more focused on the rhythm of kneading dough and the occasional giggle from cinnamon than any idea of tradition. There's something unbeatably satisfying about watching the glossy buns emerge, golden and puffy, with their sweet white crosses. It’s a recipe that invites hands-on mess and a little flour-dusted countertop chaos. Each batch is its own small victory and a guarantee that the house will smell incredible for hours.
I remember bringing a batch of these hot cross buns to a last-minute neighborhood picnic; they vanished almost faster than I could set them on the table, and it sparked an impromptu debate about raisins versus currants. Mixing the dough with my niece, she insisted on zesting the orange herself—resulting in a bit of zest on her nose and lots of laughter. That afternoon, everyone swapped their favorite kitchen swap-outs, but honestly, no one can ever agree on apricot jam or honey for the glaze. Somehow, that just made the next batch more fun to personalize. Even the leftovers became morning treasures, briefly warmed in the oven with a dab of butter.
Ingredients
- Bread flour: Provides hearty structure and a slightly chewy crumb—go for high-protein flour for that classic texture.
- Granulated sugar: Just enough sweetness to balance the spices; I find mixing it in well ensures no clumps.
- Active dry yeast: The magic lifter; make sure it's fresh and not expired for a perfect rise.
- Salt: Don’t skimp—it sharpens the spice and sweetness.
- Ground cinnamon: Smells as good during mixing as when baking, and adds real character to the buns.
- Ground nutmeg: Adds depth, but a little goes a long way—don’t be heavy handed.
- Ground allspice: This subtle ingredient rounds out the warmth—try not to skip it.
- Whole milk: The slight creaminess makes the dough tender; make sure it’s just lukewarm to keep the yeast happy.
- Unsalted butter: Melted into the dough, it gives richness and helps that glossy finish; cool it a minute before mixing in.
- Eggs: Room temperature is best—they bind and enrich the dough beautifully.
- Raisins or currants: Plump and sweet, they’re little bursts of flavor; sometimes I soak them briefly in hot water to make them extra juicy.
- Orange zest (optional): Adds a cheery, citrusy brightness—especially nice in spring.
- All-purpose flour (for cross paste): Simple and classic for those decorative crosses.
- Water (for cross paste and glaze): Use enough to make thick paste—don’t worry, you’ll get a feel for it after a try or two.
- Apricot jam or honey: The finishing shine; I like apricot for a slight tang, but honey is cozy too.
Tired of Takeout? 🥡
Get 10 meals you can make faster than delivery arrives. Seriously.
One email. No spam. Unsubscribe anytime.
Instructions
- Mix the dry ingredients:
- Toss flour, sugar, yeast, salt, and your fragrant trio of spices into a big bowl and stir until the colors blend and the aroma hits your nose.
- Add the wet ingredients:
- Pour in lukewarm milk, warm melted butter, and eggs, then mix until you have a sticky, shaggy dough that’s just begging to be kneaded.
- Knead the dough:
- Roll up your sleeves and knead by hand or mixer for about 8–10 minutes, listening for that soft, slapping sound and feeling the dough go from sticky to delightfully smooth and elastic.
- Add the fruit:
- Scatter in the raisins (and orange zest if you like), and knead just enough to evenly distribute the chewy little jewels.
- Let it rise:
- Pop the dough in a greased bowl, cover, and tuck it somewhere warm—come back in about an hour to see if it’s puffed up and doubled.
- Shape the buns:
- Punch down that happy dough, then divide into 12 pieces and roll each into a tight, smooth ball between your hands.
- Second rise:
- Set the balls gently on a parchment-lined tray, space them slightly, cover again, and let them plump up for another 45 minutes.
- Preheat the oven:
- Heat your oven to 375°F (190°C) so it’s ready to work its golden magic.
- Pipe the crosses:
- Mix the flour and water for the paste until it’s thick but pipeable—load into a bag, snip the tip, and doodle a simple cross over each bun.
- Bake:
- Slide buns into the oven and bake for 20–25 minutes, watching for a lovely golden glow.
- Make the glaze:
- While the buns bake, gently warm your jam or honey with a splash of water until smooth and glossy.
- Glaze and cool:
- Brush the hot buns with glaze the moment they come out—let them cool just long enough to handle, then dig in.
 Save
Save One rainy spring morning, I tossed a batch of fresh hot cross buns into a picnic basket for my kids’ soccer game. Everyone ended up huddled under a gazebo, munching sticky buns and laughing over orange zest stuck to my son’s cheek—suddenly the drizzle didn’t matter at all, and those buns felt like little bits of sunshine.
Making Them Ahead for Busy Days
Life never waits, and sometimes I prep the dough the night before and let it rise slowly in the fridge. The next morning, shaping the buns feels like a head start on the day—and the second rise comes with enough time for coffee and a quick cleanup. Don’t worry if the dough feels a bit cold; it wakes right up in the warmth of your kitchen. If your mornings are hectic, you’ll appreciate that bit of flexibility.
Switch Up the Flavors for Fun
There’s a quiet delight in swapping out half of the raisins for tart dried cranberries or sweet apricots, especially if you’re baking for friends with bold tastes. Sometimes I add a handful of mixed candied peel for extra sparkle—the possibilities encourage playful experiments and make each batch familiar but new. If you use honey for the glaze instead of jam, the result is a warmer, cozier bun that feels right alongside a mug of tea.
Serving and Storing Without Fuss
Don’t fret if you end up with leftovers—split and toast them next day for a breakfast that’s somehow even better. The buns keep well in an airtight container, or stash a few in the freezer in case of unexpected guests. Just remember to reheat them gently to recapture their softness.
- Your buns will be best eaten fresh from the oven.
- If you freeze them, wrap tightly to avoid freezer burn.
- Always serve with soft butter for that irresistible melt.
 Save
Save I hope your kitchen fills with sweet spice and a little laughter as you bake these buns—don’t be surprised if they’re gone before you can snap a photo.
Recipe Questions & Answers
- → How do I prevent dense buns?
Use lukewarm milk (not hot), proof the yeast until bubbly, and knead 8–10 minutes until the dough is smooth and elastic. Avoid adding too much flour when shaping; a slightly tacky dough gives lighter buns.
- → Can I swap the raisins for other dried fruit?
Yes. Replace up to half the raisins with chopped dried apricots or cranberries for brightness. Fold dried fruit in toward the end of kneading to distribute without breaking the dough structure.
- → How do I get a glossy glaze?
Heat apricot jam (or honey) with a little water until smooth, strain if needed, and brush onto buns immediately after they come out of the oven for a shiny, sticky finish.
- → What if I don’t have a piping bag for the crosses?
Use a small zip-top bag and snip one corner to pipe the flour-and-water paste. A spoon and steady hand also work for rough crosses—just keep the lines thin so they bake through.
- → How should I store and reheat leftovers?
Store cooled buns in an airtight container for up to 2 days at room temperature or freeze for up to 2 months. Reheat from frozen in a low oven or microwave briefly, and refresh with a light brush of warmed jam or butter.
- → How can I tell when the buns are done?
They should be golden brown, sound hollow when tapped on the bottom, and register about 190–200°F (88–93°C) internally. If unsure, bake an extra 2–3 minutes rather than underbaking.