 Save
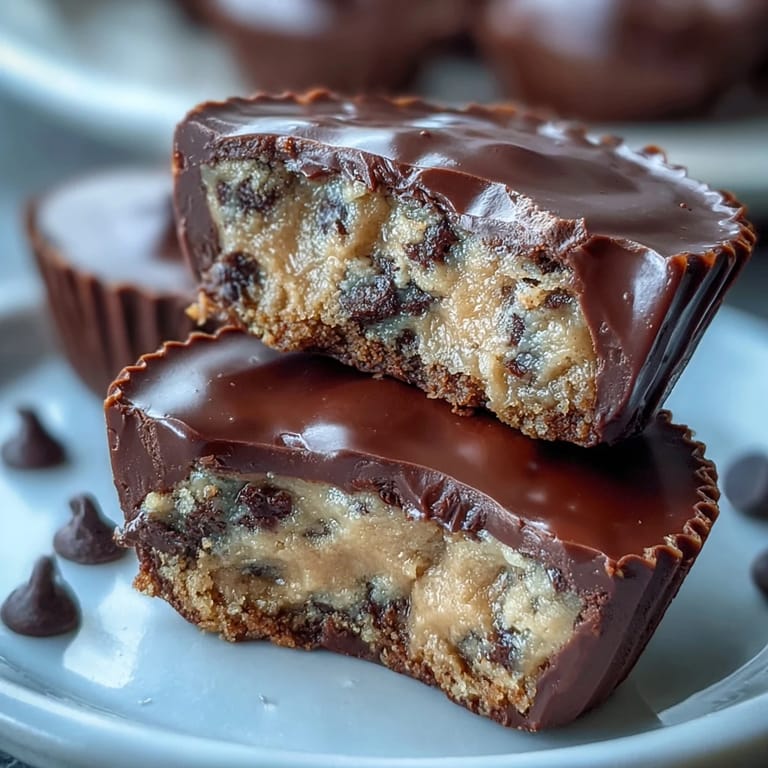
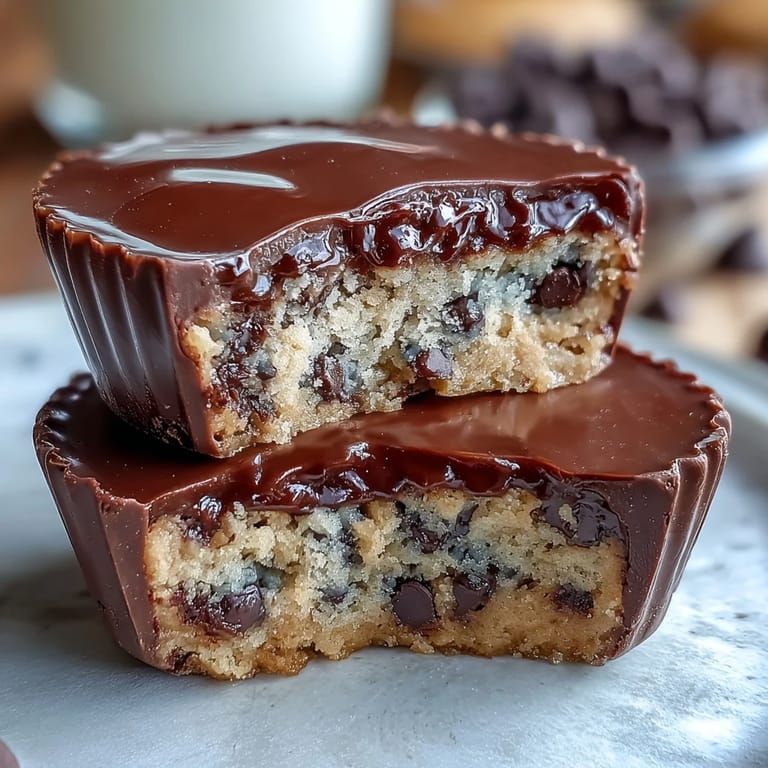
Save My roommate challenged me to combine two things she loved most: cookie dough and peanut butter cups. I spent an afternoon tinkering with ratios, melting chocolate at just the right temperature, and realizing that heat-treating flour meant I could actually eat raw cookie dough without worry. The first batch disappeared in minutes, and suddenly I wasn't just making candy—I was making her favorite thing.
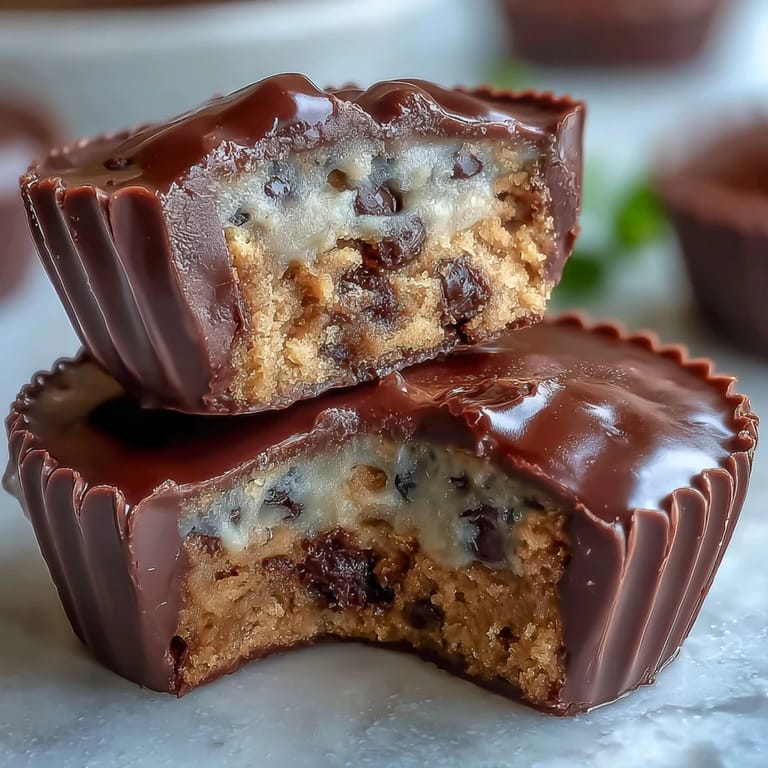
Last winter, I brought these to a potluck where everyone expected store-bought candies, and watching someone bite through that chocolate shell into peanut butter and actual cookie dough was pure magic. The silence that followed, then the question: "Did you really make these?" That's the moment I knew I'd created something special.
Ingredients
- Unsalted butter (1/4 cup for dough, 2 tbsp melted for peanut butter layer): Keep it softened for the cookie dough so it creams smoothly with sugar, creating that tender crumb structure even though there's no baking happening.
- Light brown sugar and granulated sugar (1/4 cup plus 2 tbsp): The combination of both sugars gives you depth and moisture; brown sugar adds chewiness while granulated keeps it from being too dense.
- Vanilla extract (1/2 tsp): Just enough to round out the flavor without making it taste artificial or overpowering.
- Milk (1 tbsp): This small amount binds everything together and prevents the dough from being dry or crumbly.
- Heat-treated all-purpose flour (1/2 cup): This is non-negotiable if you want to eat raw cookie dough safely; microwave it for one minute with stirring halfway through, and it tastes exactly like regular flour.
- Salt (1/4 tsp for dough, pinch for peanut butter): Salt enhances sweetness and makes the chocolate and peanut butter sing without tasting salty itself.
- Mini chocolate chips (1/3 cup): Small size means they distribute evenly and melt slightly into the dough, creating little pockets of chocolate throughout.
- Creamy peanut butter (1/2 cup): Use a quality brand you actually enjoy eating straight from the jar; this is the heart of your filling.
- Powdered sugar (1/4 cup): This sweetens and lightens the peanut butter layer so it's not a dense, oily pocket but something more delicate.
- Semisweet or milk chocolate chips (2 cups): Semisweet gives you grown-up chocolate flavor while milk chocolate leans sweeter; choose based on your mood.
- Coconut oil or vegetable oil (2 tsp): A small amount thins the chocolate just enough to coat smoothly without making it greasy or changing the taste.
Tired of Takeout? 🥡
Get 10 meals you can make faster than delivery arrives. Seriously.
One email. No spam. Unsubscribe anytime.
Instructions
- Heat-treat your flour first:
- Microwave it on high for one minute, stirring halfway through, so you can eat the cookie dough without worry. This takes two minutes but matters.
- Cream the butter and sugars:
- Beat softened butter with brown sugar and granulated sugar until the mixture is light and fluffy, about two minutes. You're looking for it to turn noticeably lighter in color.
- Build the dough:
- Mix in vanilla and milk until combined, then fold in your heat-treated flour and salt. The dough should come together without streaks of flour, then fold in the mini chocolate chips gently so they stay whole.
- Chill the dough:
- Pop it in the fridge while you work on the chocolate layer; this keeps it firm and easier to handle later.
- Line your muffin tin:
- Fit paper liners into all twelve cups of a muffin tin; this makes removing the finished cups so much easier.
- Melt the chocolate gently:
- Combine chocolate chips and coconut oil in a microwave-safe bowl and heat in thirty-second bursts, stirring between each one, until completely smooth. Don't rush this or the chocolate will seize.
- Create the chocolate base:
- Spoon about one tablespoon of melted chocolate into each liner, then tilt and tap the pan so the chocolate coats the bottom evenly. Freeze for ten minutes until set.
- Make the peanut butter layer:
- While chocolate sets, mix peanut butter with melted butter, powdered sugar, and a pinch of salt until smooth and spreadable. It should look almost whipped.
- Add the peanut butter:
- Drop a heaping teaspoon of peanut butter mixture onto the chocolate base in each cup and flatten it slightly with the back of a spoon, leaving a tiny border so the chocolate can seal around it.
- Press in the cookie dough:
- Scoop about one teaspoon of chilled cookie dough and gently press it onto the peanut butter layer in each cup. The dough should sit visible on top.
- Top with chocolate:
- Spoon melted chocolate over each cup until the fillings are completely covered and the tops are smooth. Use a small spoon to guide it into any gaps.
- Final chill:
- Refrigerate or freeze for at least twenty minutes until everything is completely set and the chocolate snaps when you bite it.
 Save
Save The real magic happens when someone bites through three distinct layers and suddenly understands why you spent thirty minutes layering candy in a muffin tin. It stops being a recipe and becomes a memory of what homemade can taste like.
The Cookie Dough Question
Raw cookie dough has a reputation for being dangerous, but heat-treating flour is genuinely simple and changes nothing about the flavor or texture. I was skeptical until I made a batch and couldn't taste any difference—it just tastes like cookie dough should, except you don't have to worry.
Chocolate Melting Science
The thirty-second bursts in the microwave prevent chocolate from overheating and seizing, which would turn it grainy and unusable. I learned this the hard way by melting an entire batch too fast, and now I'm evangelical about patience with chocolate.
Making Them Your Own
Once you understand the layer structure, you can play with almost anything. I've added sprinkles of flaky sea salt before the final freeze, swapped in dark chocolate for a sophisticated edge, and even tried almond milk in the dough for a dairy-free version that tasted just as good. The framework stays the same; the creativity is up to you.
- Try sprinkling flaky sea salt or crushed freeze-dried berries on top before the final chill for unexpected flavor combinations.
- Dark chocolate tastes richer and less sweet, which balances the candy nature of these cups if you prefer less sugar in your bites.
- Store them in an airtight container in the fridge for up to two weeks, and they taste best eaten straight from the cold.
 Save
Save These peanut butter cups prove that homemade candy doesn't need to be complicated, just intentional. Make them once, and you'll understand why they disappear immediately.
Recipe Questions & Answers
- → How do I safely use flour in the dough?
Heat-treat the flour by microwaving it for 1 minute or baking at 350°F for 5 minutes to eliminate any bacteria before mixing it in.
- → Can I substitute dairy ingredients for a vegan version?
Yes, using almond or oat milk in place of regular milk works well to maintain the creamy texture without dairy.
- → What chocolate types are best for coating?
Semisweet or milk chocolate chips melt smoothly and pair perfectly, but dark chocolate offers a richer flavor for a bolder taste.
- → How long should the peanut butter cups chill?
Chill them for at least 20 minutes in the fridge or freezer to ensure the layers set firmly before serving.
- → What equipment is needed to prepare these treats?
A 12-cup muffin tin, paper liners, mixing bowls, and a microwave-safe bowl for melting chocolate are essential.
- → Are these treats suitable for vegetarians?
Yes, all ingredients used here comply with a vegetarian diet, using no animal-based gelatin or additives.