 Save
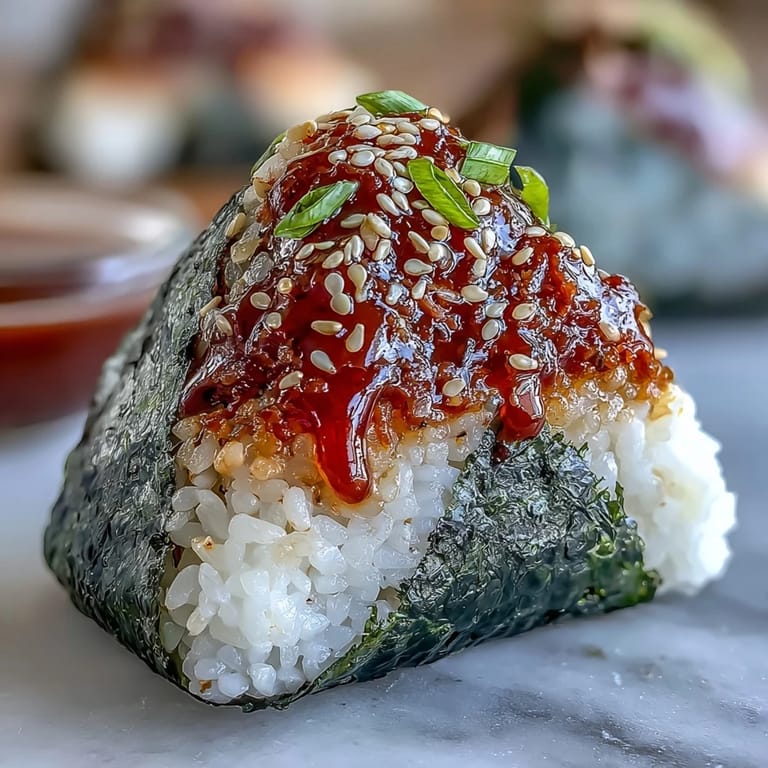
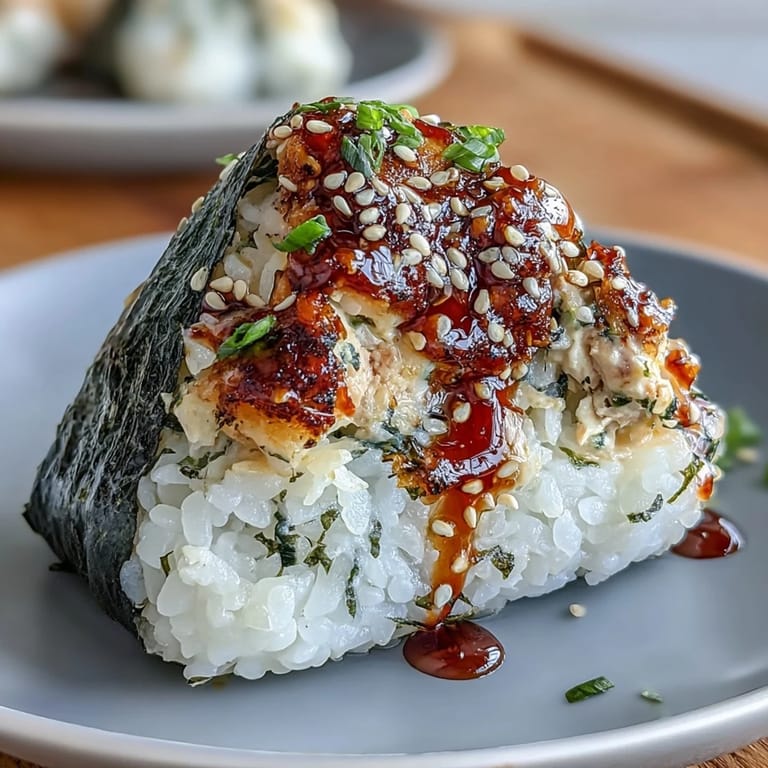
Save My coworker Sarah brought spicy tuna onigiri to lunch one random Thursday, and I still remember the moment I bit into that perfectly formed triangle—the nori crackled, the rice yielded just right, and that spicy tuna filling hit with this amazing umami punch that made me stop mid-sentence. She laughed at my reaction and casually mentioned she made six of them in twenty minutes that morning before work. I was hooked, and by the next week, I'd already made my first batch at home, slightly panicked about the shaping but utterly determined to nail it.
I made these for a picnic last summer with friends who were skeptical about anything involving rice balls, convinced they'd be mushy or weird. But when they unwrapped that nori and felt how snappy it was against their fingers, they were converted instantly. One friend asked for the recipe right then and there, sitting on a blanket overlooking the water with sesame seeds scattered across her lap.
Ingredients
- Japanese short-grain rice (2 cups): This isn't the rice you'd use for everyday cooking—the starch content and sticky texture are what hold these beauties together, so don't substitute with long-grain or you'll end up frustrated.
- Water (2 1/4 cups): The ratio matters here; too little water and your rice stays crunchy, too much and you're dealing with rice soup.
- Rice vinegar, sugar, and salt (1 tablespoon, 1 teaspoon, 1/2 teaspoon): This trio is the secret to restaurant-quality seasoned rice that actually tastes like something rather than plain steamed grain.
- Tuna in water or sushi-grade raw tuna (5 oz / 140 g): If using canned, drain it really thoroughly or your filling becomes a watery mess; if using raw, make absolutely sure it's labeled sushi-grade for safety.
- Japanese Kewpie mayonnaise (2 tablespoons): It's tangier and creamier than regular mayo, and honestly, it's worth hunting down because it elevates the whole thing, though regular works if you're in a pinch.
- Sriracha or hot sauce (1 teaspoon): Start conservative and taste before adding more—spice builds on itself and you can't take it back.
- Soy sauce and sesame oil (1 teaspoon each): These two bring depth and that toasted, nutty backbone that makes people ask what your secret ingredient is.
- Green onion, finely chopped (1): It adds a fresh brightness that cuts through the richness of the mayo and keeps things from feeling one-note.
- Nori sheets (3, cut in half): Buy the thicker, darker stuff meant for wrapping—the thin snacking nori doesn't hold up and feels flimsy.
- Salt for shaping and toasted sesame seeds (optional): Salt on your hands helps prevent sticking and adds subtle flavor; the seeds are purely optional but they look gorgeous and add a textural pop.
Tired of Takeout? 🥡
Get 10 meals you can make faster than delivery arrives. Seriously.
One email. No spam. Unsubscribe anytime.
Instructions
- Rinse and cook the rice:
- Run cold water over the rice in a fine mesh strainer, swishing it around until the water runs clear—this removes excess starch so your rice doesn't turn into a gluey mess. Cook it according to package directions, then let it sit undisturbed for ten minutes after the heat turns off; this resting period is crucial for fluffy, separate grains.
- Season the warm rice:
- While the rice is still warm but not piping hot, dissolve the rice vinegar, sugar, and salt together, then gently fold it into the rice using a rice paddle or wooden spoon to avoid mashing. Let it cool to room temperature before you start shaping—hot rice is impossible to work with and burns your hands.
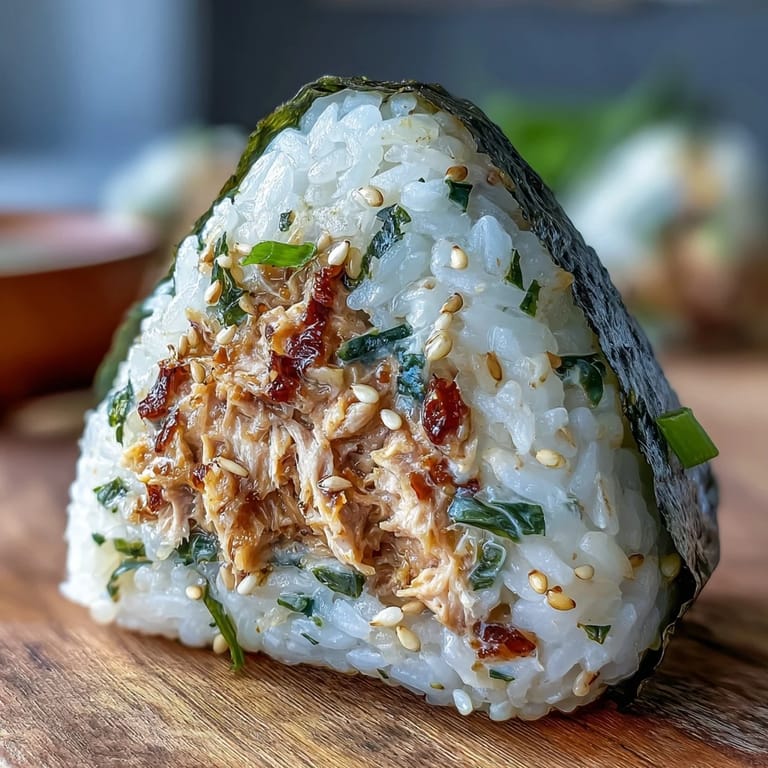
- Prepare the spicy tuna filling:
- Combine the drained tuna, mayo, Sriracha, soy sauce, sesame oil, and chopped green onion in a bowl and mix thoroughly. Taste it and adjust the heat or saltiness because this is your moment to get it exactly how you want it.
- Set up your shaping station:
- Get a small bowl of water and another with salt within arm's reach before you start shaping, because once you begin, you'll want to move quickly. Wet your hands, sprinkle them lightly with salt, and you're ready to build.
- Shape the onigiri:
- Scoop about 1/2 cup of rice into your palm and gently flatten it into a disc, then place 1-2 teaspoons of the spicy tuna filling in the center. Fold the edges of rice up and around the filling, gently pressing as you form a triangle—it should feel firm enough to hold together but not so tight that you're squishing it.
- Wrap with nori and finish:
- Take a half-sheet of nori and wrap it around the bottom third of each onigiri, pressing gently so it sticks to the rice. If you want to get fancy, sprinkle some toasted sesame seeds on top.
- Serve or store:
- Eat them immediately while the nori still has that satisfying snap, or wrap them tightly in plastic wrap and refrigerate for up to a day.
 Save
Save There's something almost meditative about the hand-shaping process—the temperature, the slight give of the rice, the moment when you realize you've actually created something that holds together. My mom watched me make these one afternoon and asked if she could try shaping one, and seeing her hands work the rice with that careful concentration made me understand why these are more than just food in Japanese culture.
When to Use Canned Versus Raw Tuna
Canned tuna is the reliable choice—it's shelf-stable, affordable, and honestly delicious when you drain it well and mix it with the mayo and spices. Raw sushi-grade tuna from a trusted fishmonger or Asian market gives you a silkier texture and cleaner, more elegant flavor, but it's pricier and demands respect for food safety, so only go this route if you're confident about your source.
The Texture Game
Onigiri are all about contrast—the snap of nori, the give of seasoned rice, the creaminess of that spicy tuna mixture. If you want to lean into this even more, a lot of people add diced cucumber or thin avocado slices to their filling, which adds a fresh crunch and prevents the whole thing from feeling heavy.
Make-Ahead and Storage Secrets
These are genuinely better made a few hours ahead because the rice firms up slightly and they become sturdier to handle and eat, though technically they keep in the fridge for about a day before the nori starts to absorb moisture. I wrap mine individually in plastic wrap and grab them straight from the fridge for lunch, and they're just slightly cooler than room temperature, which somehow feels more refreshing than eating them warm.
- Assemble them as close to eating time as possible if you want maximum nori crispness, or embrace the softer texture as part of the charm.
- Never store them in airtight containers while they're still slightly warm, or condensation will make everything soggy.
- If you're packing them for a day out, keep them separated by plastic or parchment so the nori doesn't stick to itself.
 Save
Save These spicy tuna onigiri have become my go-to lunch when I want something that feels special but doesn't require takeout, and I love how a skill that seemed intimidating the first time has become second nature. There's real joy in handing someone one of these and watching their face when they realize how good homemade tastes.
Recipe Questions & Answers
- → What type of rice is best for onigiri?
Short-grain Japanese rice works best as it becomes sticky enough to hold shapes firmly.
- → Can I use raw tuna for the filling?
Yes, sushi-grade raw tuna adds an authentic texture and flavor to the filling.
- → How spicy is the filling typically?
The heat comes from Sriracha or hot sauce, which can be adjusted to taste for milder or stronger spice.
- → What is the purpose of rice vinegar in the rice?
Rice vinegar adds subtle tanginess and helps season the rice for a balanced flavor.
- → How should onigiri be stored if not eaten immediately?
Wrap tightly in plastic wrap and refrigerate to maintain freshness, then bring to room temperature before serving.