 Save
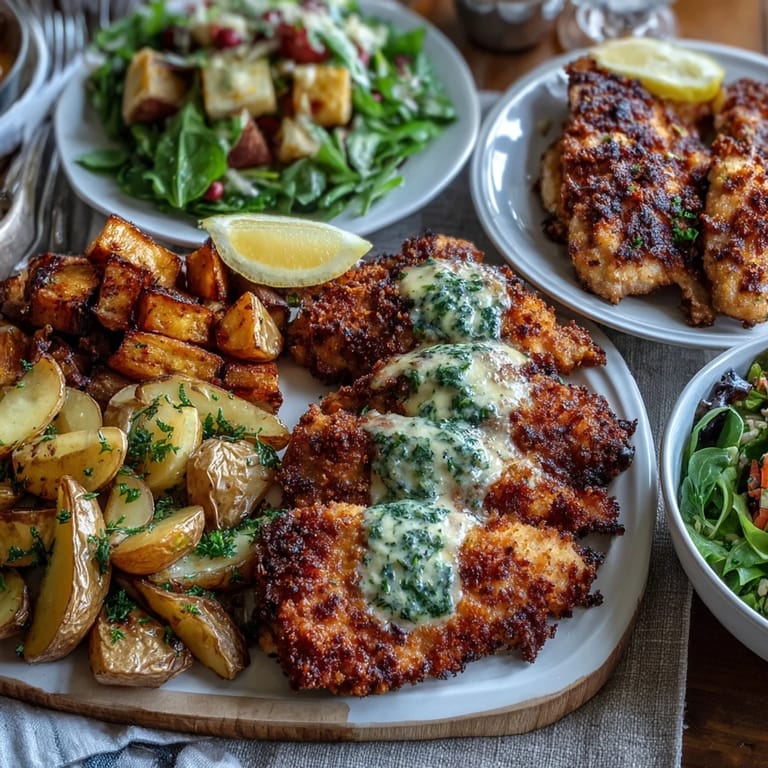
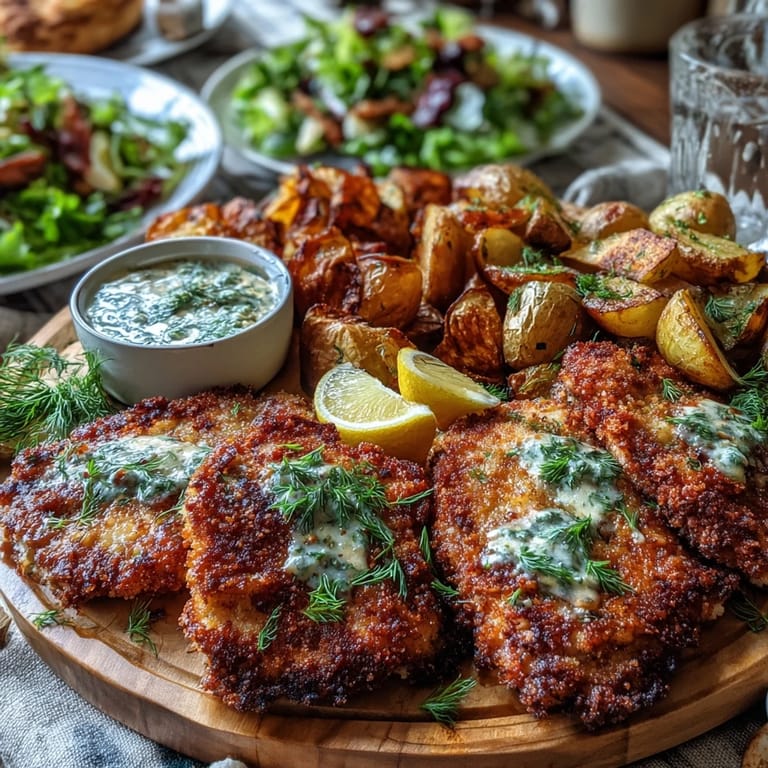
Save The first time I made lemon parmesan chicken, my kitchen smelled like an Italian grandmother had taken over for the evening. That golden crust crunching under my fork changed everything I thought about weeknight chicken dinners. My husband actually asked if I'd ordered takeout from our favorite restaurant, which I'll admit felt pretty good.
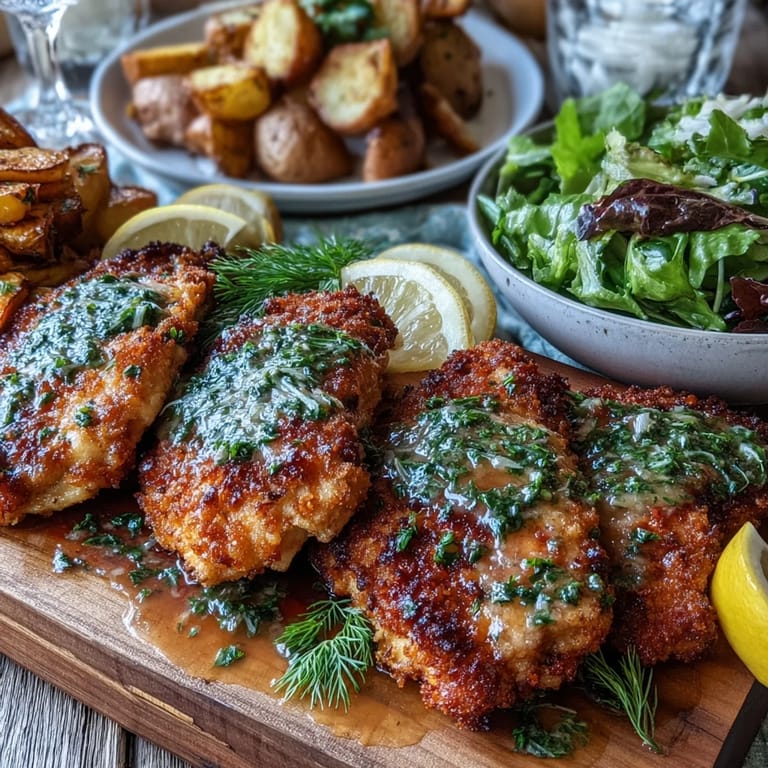
I served this at a small dinner party last spring when my sister came to visit, and she literally paused mid-bite to ask what I'd done differently. The way the bright lemon cuts through the rich parmesan coating is just magic together. Now it's become her most requested recipe whenever she visits.
Ingredients
- Chicken breast: Pat it completely dry so your coating actually sticks instead of sliding off into the pan
- Parmesan cheese: Freshly grated makes a huge difference here, the pre-grated stuff just doesn't melt the same way into that crust
- All-purpose flour: This creates the base that holds everything together, though gluten-free blends work too if needed
- Eggs: Room temperature eggs will help your coating adhere more evenly
- Garlic: Freshly minced releases way more flavor than the stuff in a jar
- Italian seasoning: This blend gives you that classic herb flavor without measuring out five different spices
- Unsalted butter: Unsalted lets you control the salt level since the parmesan is already salty
- Lemon juice: Fresh squeezed, never bottled, for that bright authentic flavor
- Chicken broth: This creates the silky body in your sauce that makes it coat the chicken perfectly
Tired of Takeout? 🥡
Get 10 meals you can make faster than delivery arrives. Seriously.
One email. No spam. Unsubscribe anytime.
Instructions
- Prep your chicken:
- Cut each breast lengthwise to create thinner cutlets, then pound gently between plastic wrap until even in thickness, about half an inch thick.
- Make your egg wash:
- Whisk together eggs, minced garlic, Italian seasoning, salt, and pepper in a shallow bowl until well combined.
- Mix the coating:
- Combine grated parmesan and flour in a separate shallow dish, stirring until evenly distributed.
- Dredge the chicken:
- Dip each cutlet into the egg mixture, let excess drip off, then press into the parmesan flour mixture until thoroughly coated.
- Sear to golden perfection:
- Heat olive oil in a large skillet over medium heat and cook chicken 4 to 5 minutes per side until golden and crisp, reaching 165 degrees F internally.
- Whisk up the sauce:
- Melt butter in a small saucepan over medium heat, add garlic for one minute until fragrant, then stir in lemon juice, broth, and pepper.
- Simmer to silken:
- Let the sauce bubble gently for two minutes until slightly thickened, then remove from heat.
- Bring it together:
- Arrange chicken on a platter, spoon that luscious sauce over the top, and finish with parsley and lemon if you're feeling fancy.
 Save
Save This became my go-to comfort food after a particularly long day at work when I just needed something that felt special but didn't require hours of effort. Something about the combination of crispy, tangy, and buttery just makes everything better.
Perfecting The Crust
I learned the hard way that pressing the coating onto the chicken firmly makes all the difference between patches of bare chicken and that gorgeous even golden crust. The parmesan creates these delicious crispy edges that everyone fights over at the table.
Balancing The Flavors
The trick is tasting your sauce before pouring it over the chicken. Sometimes lemons are more acidic than others, and you might need a pinch of sugar to balance everything out. That small adjustment took this from good to restaurant quality.
Make It Ahead
You can pound and coat the chicken up to a day ahead, storing it between parchment paper in the fridge. The sauce reheats beautifully over low heat, just whisk in a splash of cream or broth if it's too thick.
- Let the coated chicken sit at room temperature for 15 minutes before cooking
- Make double the sauce because everyone will want extra
- Serve immediately for that perfect crispy texture
 Save
Save There's something so satisfying about a dish that looks and tastes this impressive but comes together with such straightforward technique. That first crispy, buttery, lemony bite is pure comfort on a plate.
Recipe Questions & Answers
- → How do I get the parmesan coating to stick properly?
Pat the chicken completely dry before starting. Dredge in the egg mixture first, let excess drip off, then press firmly into the Parmesan-flour mixture. The flour helps bind everything together while the egg acts as the adhesive.
- → Can I make this ahead of time?
You can pound the chicken and prepare the coating mixture up to a day ahead. Store coated chicken pieces between parchment paper in the refrigerator. The sauce is best made fresh, but you can mince the garlic and squeeze the lemon juice beforehand.
- → What temperature should the chicken be cooked to?
Cook until the internal temperature reaches 165°F (74°C). Use a meat thermometer inserted into the thickest part of the cutlet to ensure it's fully cooked while remaining juicy.
- → Can I use chicken thighs instead of breasts?
Absolutely. Boneless, skinless chicken thighs work well and tend to be more forgiving. Adjust cooking time slightly as thighs may need an extra minute or two per side depending on thickness.
- → What sides pair best with this dish?
Angel hair pasta tossed with olive oil and garlic, roasted potatoes, or a crisp green salad with vinaigrette all complement the flavors beautifully. The lemon butter sauce also pairs wonderfully with steamed asparagus or green beans.
- → How can I make this gluten-free?
Substitute the all-purpose flour with a 1:1 gluten-free flour blend and ensure your chicken broth is certified gluten-free. The cooking technique remains exactly the same.