 Save
Save I'll never forget the year my grandmother transformed our holiday table with the most elegant cheese board I'd ever seen. Instead of the usual haphazard arrangement, she'd created this stunning border of golden cheese triangles that looked like tiny pine trees marching around the edge—it was the moment I realized that beautiful food doesn't have to be complicated, just intentional. Now, every December, I recreate that Tannenbaum border, and it's become my signature way to welcome guests during the holidays.
I remember my coworker Sarah walking into the office party and immediately asking, 'Did you make this?' when she spotted my Tannenbaum border on the main table. That moment—when people recognize your effort and are genuinely delighted—that's what this simple arrangement delivers every single time.
Ingredients
- Semi-firm cheese (Gouda, Edam, or Emmental), 250 g, well chilled: The chill is absolutely crucial here—it keeps the cheese firm enough to slice into clean triangles without crumbling or tearing. I learned this the hard way by using room-temperature cheese my first attempt. Semi-firm varieties have that perfect balance of sliceability and flavor that makes them ideal for this presentation.
- Small green seedless grapes, 150 g, washed and thoroughly dried: These little orbs are your secret to making the trees look real. Drying them completely prevents any moisture from making your beautiful board look slick, and their bright green color is absolutely essential to the festive effect. I always pat mine extra dry with paper towels.
Tired of Takeout? 🥡
Get 10 meals you can make faster than delivery arrives. Seriously.
One email. No spam. Unsubscribe anytime.
Instructions
- Chill Your Cheese First:
- Take your cheese straight from the refrigerator and place it on a clean cutting board. The cold makes everything easier—you'll get cleaner cuts and the cheese will hold its shape beautifully as you work.
- Slice Into Pine Tree Shapes:
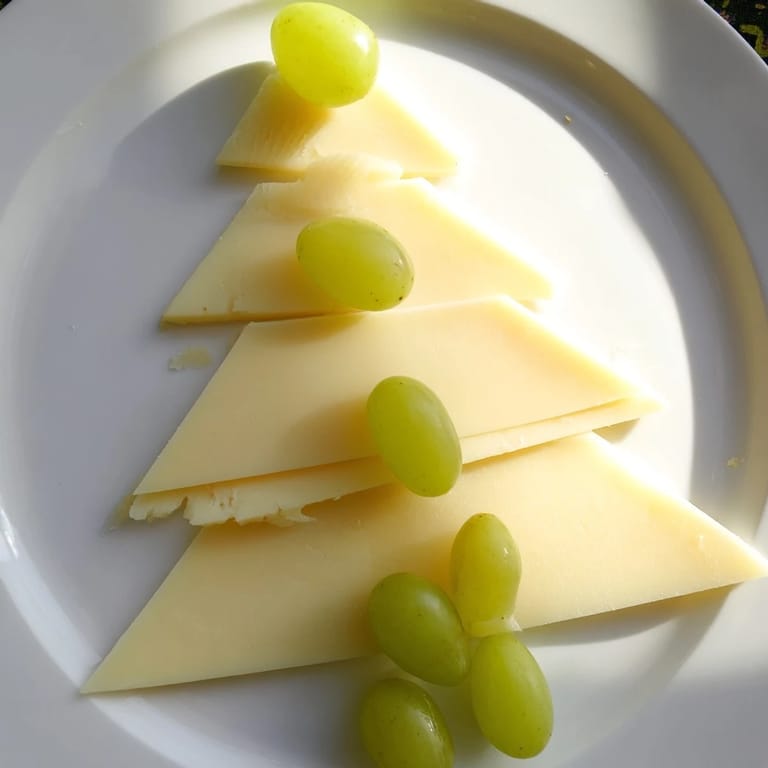
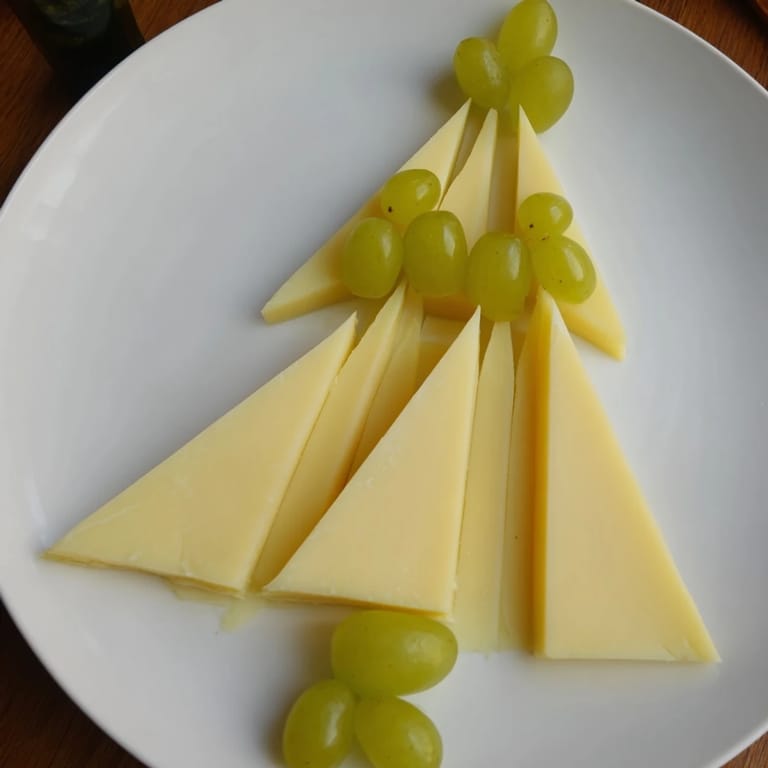
- Using a sharp chef's knife, cut the cheese into thin triangular pieces about 5 to 6 centimeters long, making them roughly 1 centimeter wide at the base. Think of each slice as a tiny stylized pine tree. The first few might feel awkward, but by the third or fourth one, your hand will find the rhythm. Angle your knife to create that satisfying pointed tip.
- Create Your Border Framework:
- Start at one corner of your serving platter and begin arranging the cheese triangles with their points facing outward, creating a continuous line around all four edges. This is where the magic happens—as you place each triangle, step back and admire how they're starting to look like a festive garland.
- Tuck Grapes Into the Gaps:
- Once your cheese outline is in place, nestle the green grapes between and around the triangles. This fills those awkward spaces and enhances the tree-like effect, making the border look fuller and more intentional. You're essentially tucking little green ornaments around your cheese trees.
- Fill the Center:
- Now comes the fun part—fill the entire center of your board with whatever cheeses, cured meats, crackers, and accompaniments you love. The Tannenbaum border frames everything beautifully and gives your spread an instant holiday elegance.
 Save
Save What started as just a pretty way to frame a cheese board became something my kids now ask for every holiday party. When my daughter brought her friends over and they all gathered around asking, 'Did you really make this?' I realized that sometimes the simplest presentations create the most memorable moments.
Making It Colorfully Festive
Once you've mastered the basic green-and-gold combination, don't be afraid to play with color. I've learned that a handful of ruby red grapes scattered among the green ones creates a stunning visual pop, and if you can find pomegranate seeds, their jewel-like appearance adds genuine luxury to the presentation. Rosemary sprigs tucked along the border amplify that pine tree effect and add an aromatic touch that people absolutely notice. The key is restraint—you want the cheese triangles and grapes to remain the stars; the extra touches should just enhance what's already beautiful.
Cheese Selection Matters
I've experimented with dozens of cheese varieties over the years, and here's what I've discovered: your border cheese doesn't have to be mild or fancy, it just needs to be sliceable and visually appealing. Gouda gives you that gorgeous golden hue, Edam offers a slightly nuttier note, and Emmental brings subtle complexity. What changed everything for me was realizing that the border and the board's filling can feature completely different cheeses. Use a more delicate, interesting cheese in your center arrangement, and keep your border cheese neutral and photogenic. Your guests will taste the nuance in the center selections while the border does its job—looking absolutely stunning and framing everything else.
Timing and Preparation Strategy
The beauty of this arrangement is that it comes together in moments, but there's a rhythm to doing it well. I always prepare my cheese the morning of or several hours ahead, keeping the slices between parchment paper in the refrigerator so they stay cold and don't pick up other flavors. I wait to actually assemble the border until about 30 minutes before guests arrive, which keeps everything crisp and prevents the cheese from warming up and losing its structure. The grapes can be washed and dried hours ahead with no problem. This approach means you're not panicking in those final moments—you're just doing a quick, beautiful assembly that looks effortless.
- Slice your cheese ahead and layer it between parchment for perfect cold storage
- Wash and dry grapes several hours in advance and keep them in a covered container
- Assemble your border 20 to 30 minutes before serving for optimal appearance and texture
 Save
Save This simple arrangement has taught me that hospitality isn't about complexity—it's about intention and care. Every time someone notices the Tannenbaum border and smiles, I'm reminded that the most meaningful dishes are the ones made with love and presented with a little extra thought.
Recipe Questions & Answers
- → What type of cheese works best for the border?
Semi-firm cheeses like Gouda, Edam, or Emmental are ideal because they hold their shape when sliced thinly.
- → How should the cheese be cut to resemble pine trees?
Slice the cheese into thin triangular pieces about 5–6 cm long and 1 cm wide at the base to mimic stylized pine shapes.
- → Can other fruits be used instead of green grapes?
Yes, small red grapes or pomegranate seeds can be alternated to add color contrast and variety.
- → How do you arrange the border on the cheese board?
Place the triangular cheese pieces along all four edges with points facing outward, then nestle grapes between the triangles to fill gaps.
- → Are there suggestions to enhance the pine tree effect?
Adding fresh rosemary sprigs between the cheese and grapes mimics pine needles and adds aromatic depth.