 Save
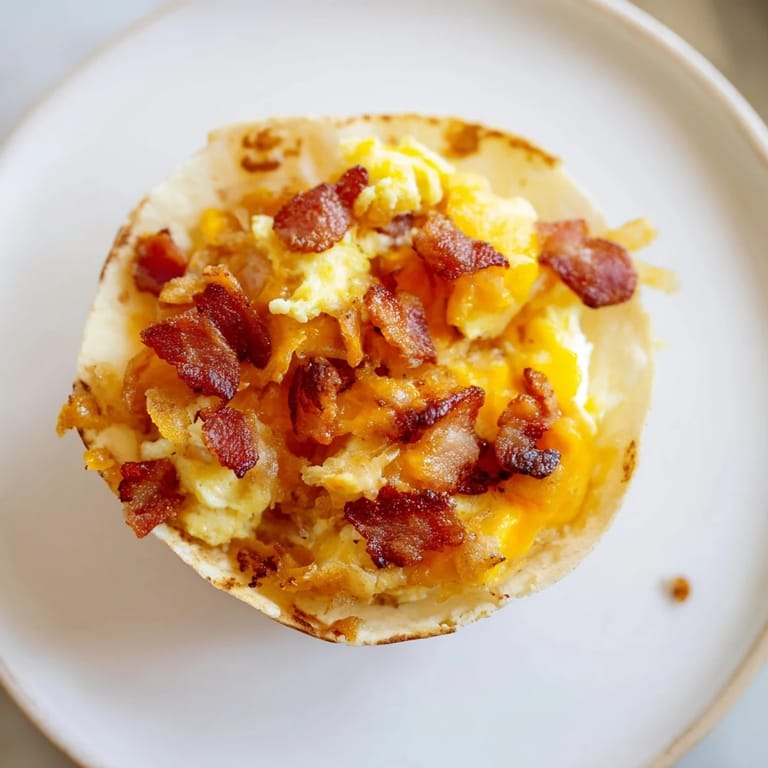
Save There's something about mornings when you smell bacon sizzling and hash browns crisping that makes everything feel possible. Years ago, I was tasked with bringing breakfast to a chaotic family reunion, and I wanted something that didn't require three pans and a prayer. These B.E.C. Breakfast Bites came to life that weekend, combining all the best parts of a diner breakfast into little golden bundles that people could grab and devour without making a mess on my aunt's new couch. They became the unexpected star of the morning, and honestly, I've been making them ever since.
I'll never forget the quiet moment before the first batch came out of the oven that reunion morning. My cousin wandered into the kitchen drawn by the smell, and when she bit into one still warm, her eyes went wide. She didn't say much, just grabbed another, then another. That's when I realized these weren't just convenient—they were genuinely delicious in a way that made people slow down and actually enjoy breakfast instead of scarfing it down between phone calls.
Ingredients
- All-purpose flour: The foundation for tortillas that stay soft and pliable even after baking; using the right ratio is what prevents them from becoming cardboard.
- Vegetable oil: Adds tenderness and richness to the dough, making the tortillas more forgiving when you roll them out.
- Warm water: Lukewarm is the sweet spot—too hot kills the gluten development, too cold and your dough stays stiff.
- Frozen shredded hash browns: Let them thaw completely and squeeze out the excess moisture, or they'll steam your filling instead of staying crispy.
- Bacon: Six slices gives you enough crunch and flavor without overwhelming the eggs and cheese.
- Large eggs: Six eggs scrambled with milk creates a creamy, custardy filling that doesn't dry out during baking.
- Sharp cheddar cheese: The sharpness cuts through the richness of the eggs and bacon, keeping each bite from feeling heavy.
- Butter: For cooking the hash browns and brushing the bites before baking—it's non-negotiable for that golden crust.
Tired of Takeout? 🥡
Get 10 meals you can make faster than delivery arrives. Seriously.
One email. No spam. Unsubscribe anytime.
Instructions
- Make the dough foundation:
- Combine flour and salt in a bowl, then drizzle in oil and add water gradually until a soft dough forms. You want it to feel slightly tacky but not sticky. Knead gently for a few minutes until it becomes smooth and elastic, then divide into 12 equal balls and let them rest under a towel for ten minutes—this resting period is what prevents the tortillas from fighting back when you roll them.
- Roll and cook the tortillas:
- On a floured surface, flatten each ball into a thin circle about six inches wide, working gently so you don't tear them. Cook each one on a hot, dry skillet for just a minute per side until you see light brown spots, then stack them under a clean towel to stay warm and soft.
- Get the bacon going:
- Cook the bacon in your skillet until it's properly crispy, which is when it breaks with a satisfying snap. Drain it on paper towels and chop it into small pieces that distribute evenly throughout the filling.
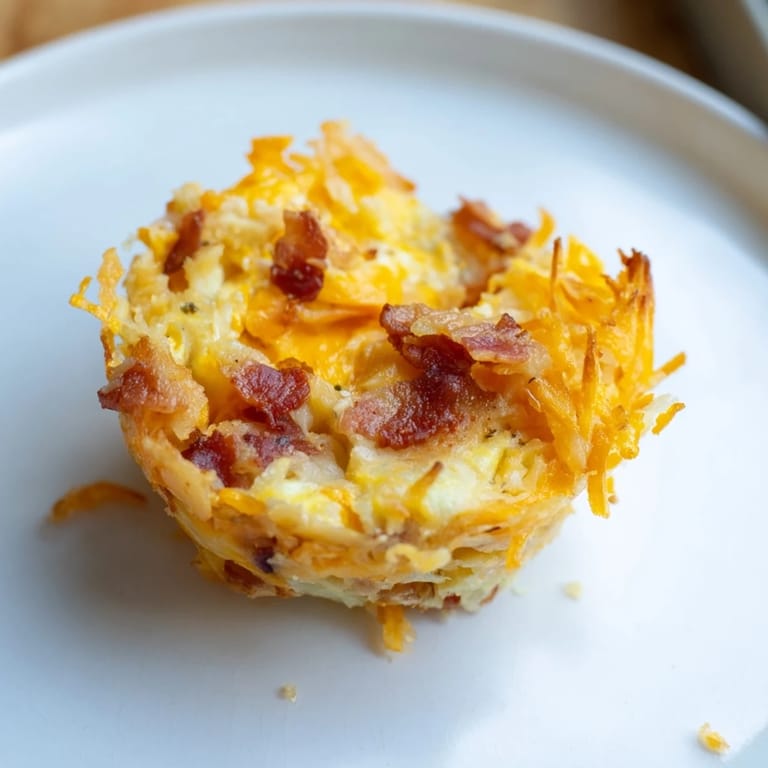
- Build the golden hash browns:
- In the same skillet you used for bacon, melt butter over medium heat and add your thawed hash browns. Stir them occasionally for five to seven minutes until they turn deep golden and smell almost nutty—this is the moment that makes all the difference in texture.
- Create the creamy egg mixture:
- Whisk eggs with milk, then pour the mixture into the skillet with the hash browns and gently scramble until the eggs are just barely set with no wet liquid remaining. This is crucial because overcooked eggs become rubbery after baking. Fold in the shredded cheese and bacon pieces off the heat so the cheese melts evenly without cooking further.
- Assemble the bites:
- Lay a tortilla flat, add about two heaping tablespoons of filling to the center, then roll it tightly from one side, tucking in the ends as you go to form a neat little burrito package. It doesn't need to be perfect—rustic is actually more charming.
- Brush and bake:
- Arrange the bites seam-side down on a parchment-lined baking sheet and brush them lightly with melted butter or cooking spray. Bake at 400°F for ten to twelve minutes until they're golden brown and heated through, which usually means you'll smell that toasted cheese aroma and know they're ready.
 Save
Save There was one morning when my teenage son came downstairs before school and casually mentioned he'd grabbed one of these from the fridge, eaten it cold on the way out the door, and it was still somehow better than the breakfast sandwich from the coffee shop he usually buys. I realized right then that homemade food has this quiet power to make people feel looked after, even when they barely have time to notice.
Making the Tortillas from Scratch
The first time you make these tortillas, it might feel like you're doing something fancy, but honestly, you're not. Flour, oil, salt, and water—that's it. What happens during those few minutes of kneading is the gluten network strengthening, which sounds technical but really just means the dough becomes more cooperative. The resting period is where the real magic happens; it gives the gluten time to relax so when you roll it out, it doesn't keep shrinking back like it has its own agenda. I learned to appreciate that ten minutes of waiting because rushing it leads to tortillas that fight you the entire way.
Timing and Temperature Matter
The oven temperature of 400°F is deliberate—hot enough to make the tortillas crisp and the filling heat through completely without drying everything out. I used to think hotter was faster, so I'd crank it to 425°F, and the result was bites with burnt edges and a filling that hadn't heated evenly through the middle. Patience with temperature is one of those lessons that costs you a few batches before it clicks. The ten to twelve minute bake time gives you that perfect window where the outside turns golden and the cheese inside melts into every crevice of the egg and hash browns.
Storage, Leftovers, and Make-Ahead Magic
These bites actually improve slightly on day two because the flavors have time to meld together in the refrigerator. You can wrap them individually in foil and reheat in a 300°F oven for about five minutes, or unwrap them and give them thirty seconds in the microwave when you're genuinely rushing. I've even grabbed them straight from the fridge for quick breakfasts, and while they're less magical than warm, they're still infinitely better than most grab-and-go options. Make them on Sunday evening for a week's worth of mornings that feel intentional rather than desperate.
- Freeze unbaked bites in a single layer, then transfer to a freezer bag for up to a month of future breakfasts.
- Thaw in the refrigerator overnight and bake as usual, adding just a minute or two to the bake time.
- Reheat from frozen at 350°F for about fifteen minutes if you forgot to thaw but still want that warm, cheesy goodness.
 Save
Save These breakfast bites have somehow become the thing people specifically ask for when they know I'm cooking, which is the highest compliment a food can receive. There's something deeply satisfying about feeding people something that looks impressive but tastes like pure breakfast comfort.
Recipe Questions & Answers
- → How do I make the tortillas soft and pliable?
Use warm water when mixing the dough and cook tortillas briefly on a hot skillet, covering with a towel to keep them soft.
- → Can I prepare the filling ahead of time?
Yes, the hash browns, eggs, bacon, and cheese mixture can be prepared in advance and refrigerated until assembly.
- → What are good vegetarian substitutes for bacon?
Sautéed mushrooms or veggie sausage work well to keep the savory flavor without meat.
- → How should I store leftover bites?
Store leftovers in an airtight container in the refrigerator and reheat in a toaster oven or microwave before serving.
- → Can I add extra spice or flavor variations?
Yes, chopped chives, jalapeños, or hot sauce can be added for an extra kick to the filling.